M365 Secure Score

Back to Secure Score

How to Enable Advanced Ransomware Protection in Microsoft Defender

Last updated: 2026-05-14T00:00:00.000Z

Boost your M365 Secure Score by enabling the Use advanced protection against ransomware Attack Surface Reduction (ASR) rule in Microsoft Intune. This guide walks you through creating and deploying the policy using a safe staged rollout.

Estimated time: 15 minutes. Applies to: Windows 10 and later.

What You Will Achieve

Improved Secure ScoreCompleting this guide will resolve the Use advanced protection against ransomware recommendation in your M365 Secure Score, directly improving your organisation's security posture score.
Ransomware Defence via ASRThe Attack Surface Reduction rule blocks executable content and suspicious behaviours typically used by ransomware, protecting your endpoints from common attack vectors.
Safe Staged RolloutBy deploying first to a test bench group for 7 days before rolling out to all users, you reduce the risk of disruption while still achieving full compliance.

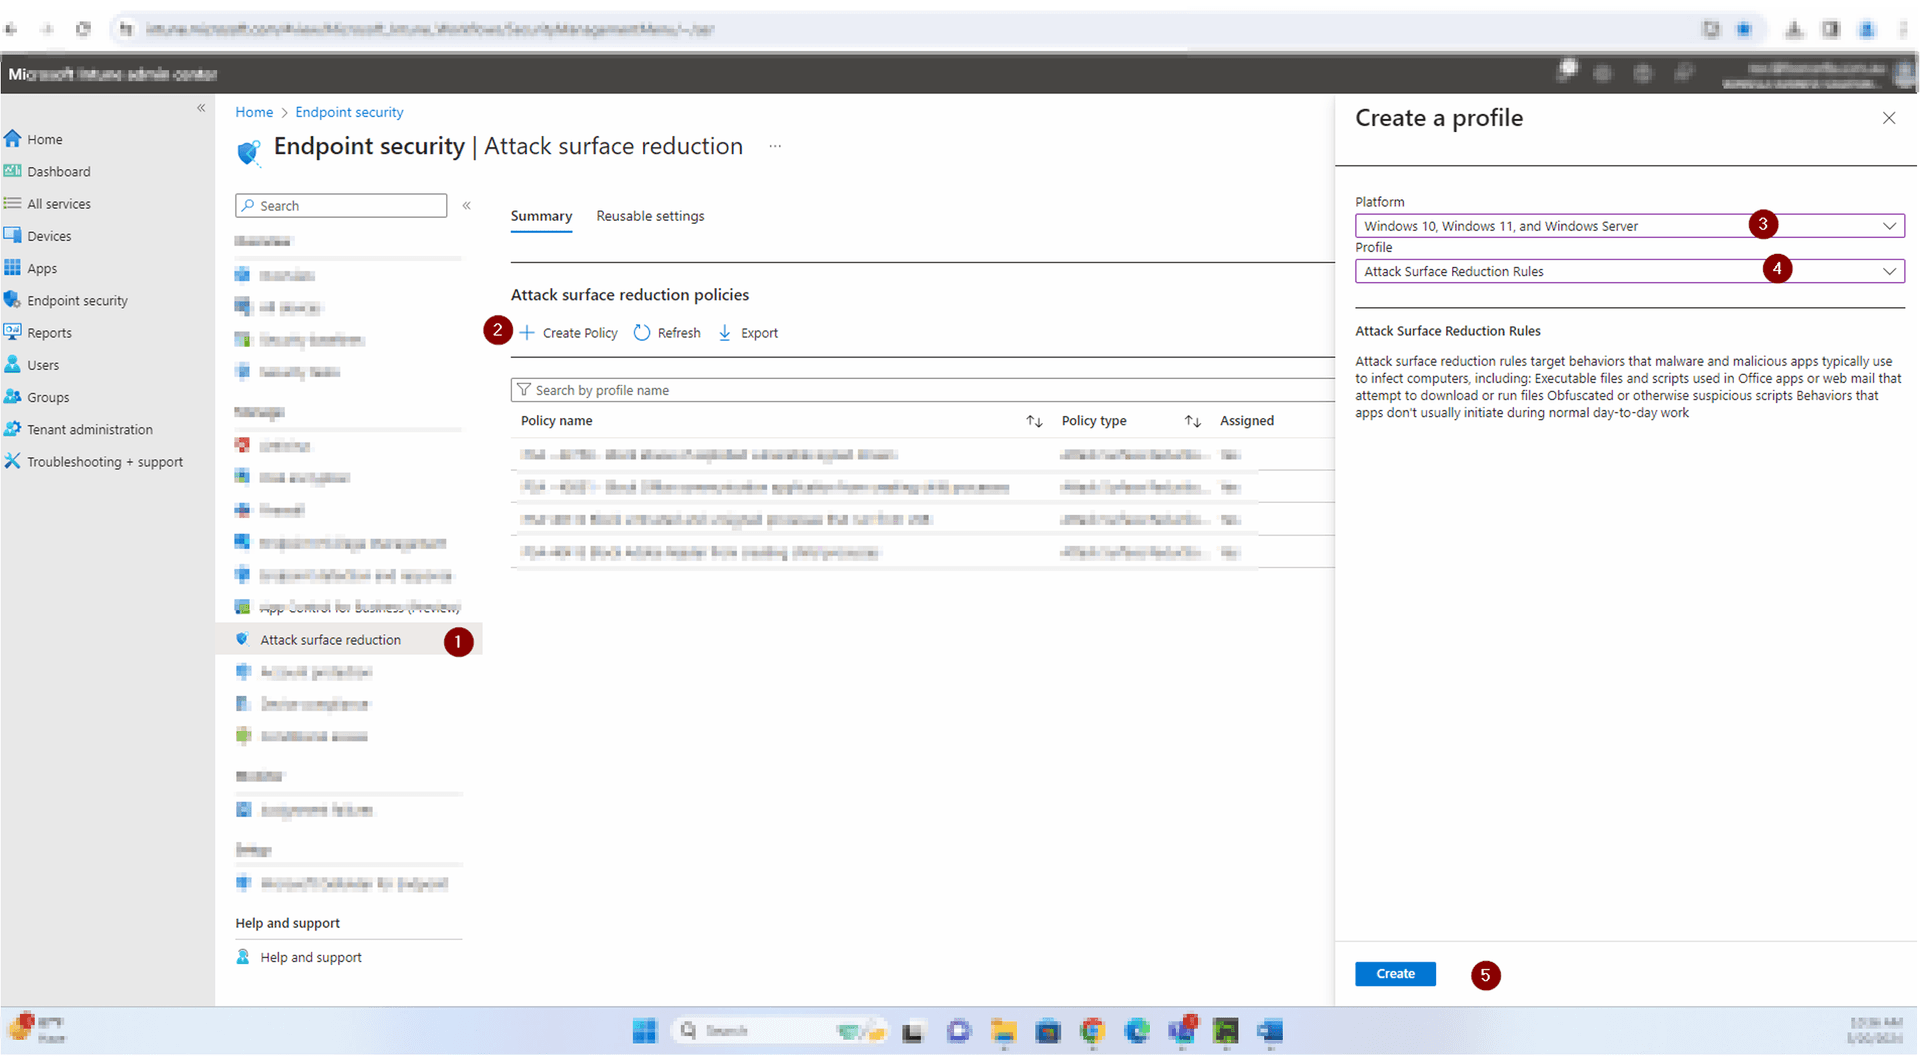
Why Enable This Setting?

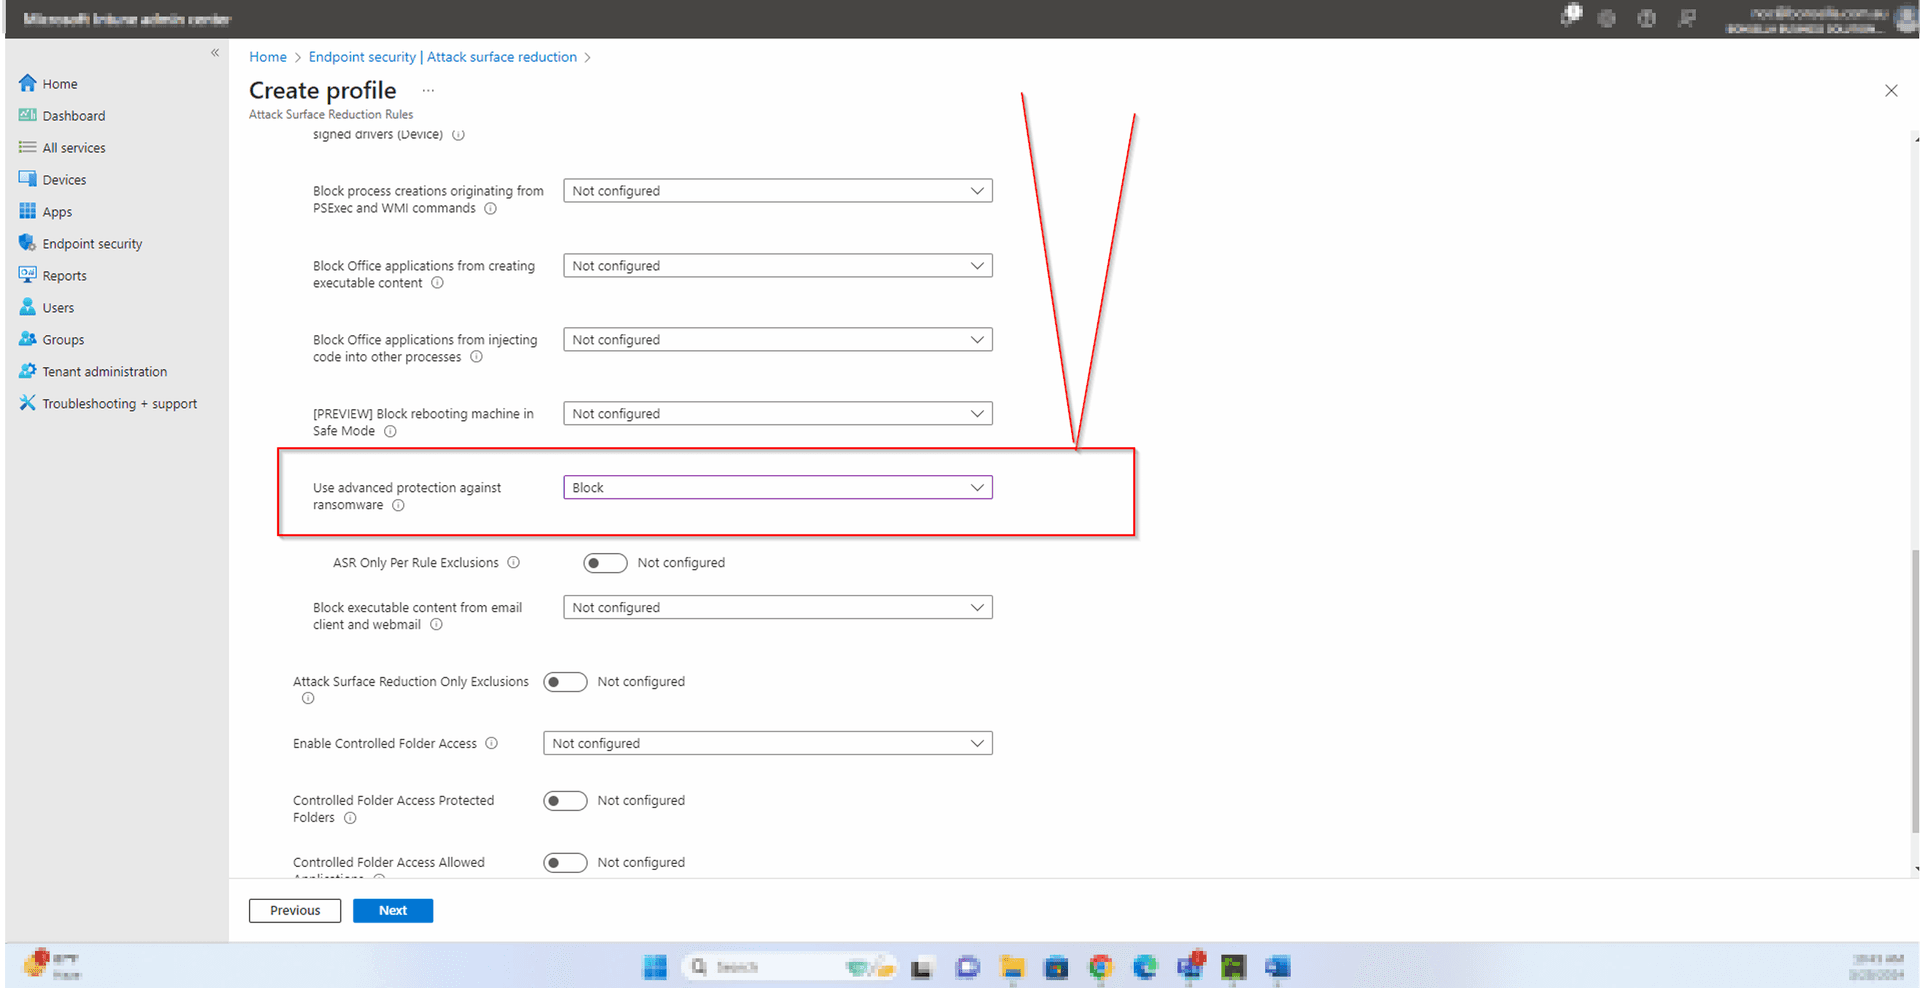
Ransomware is one of the most damaging threats facing businesses today. Microsoft's Attack Surface Reduction rules are designed to block the behaviours that ransomware and other malware rely on — including obfuscated scripts, suspicious executable content, and process injection techniques.

Enabling the Use advanced protection against ransomware rule in Block mode instructs Microsoft Defender to actively stop these behaviours rather than simply monitor them, significantly reducing your exposure.

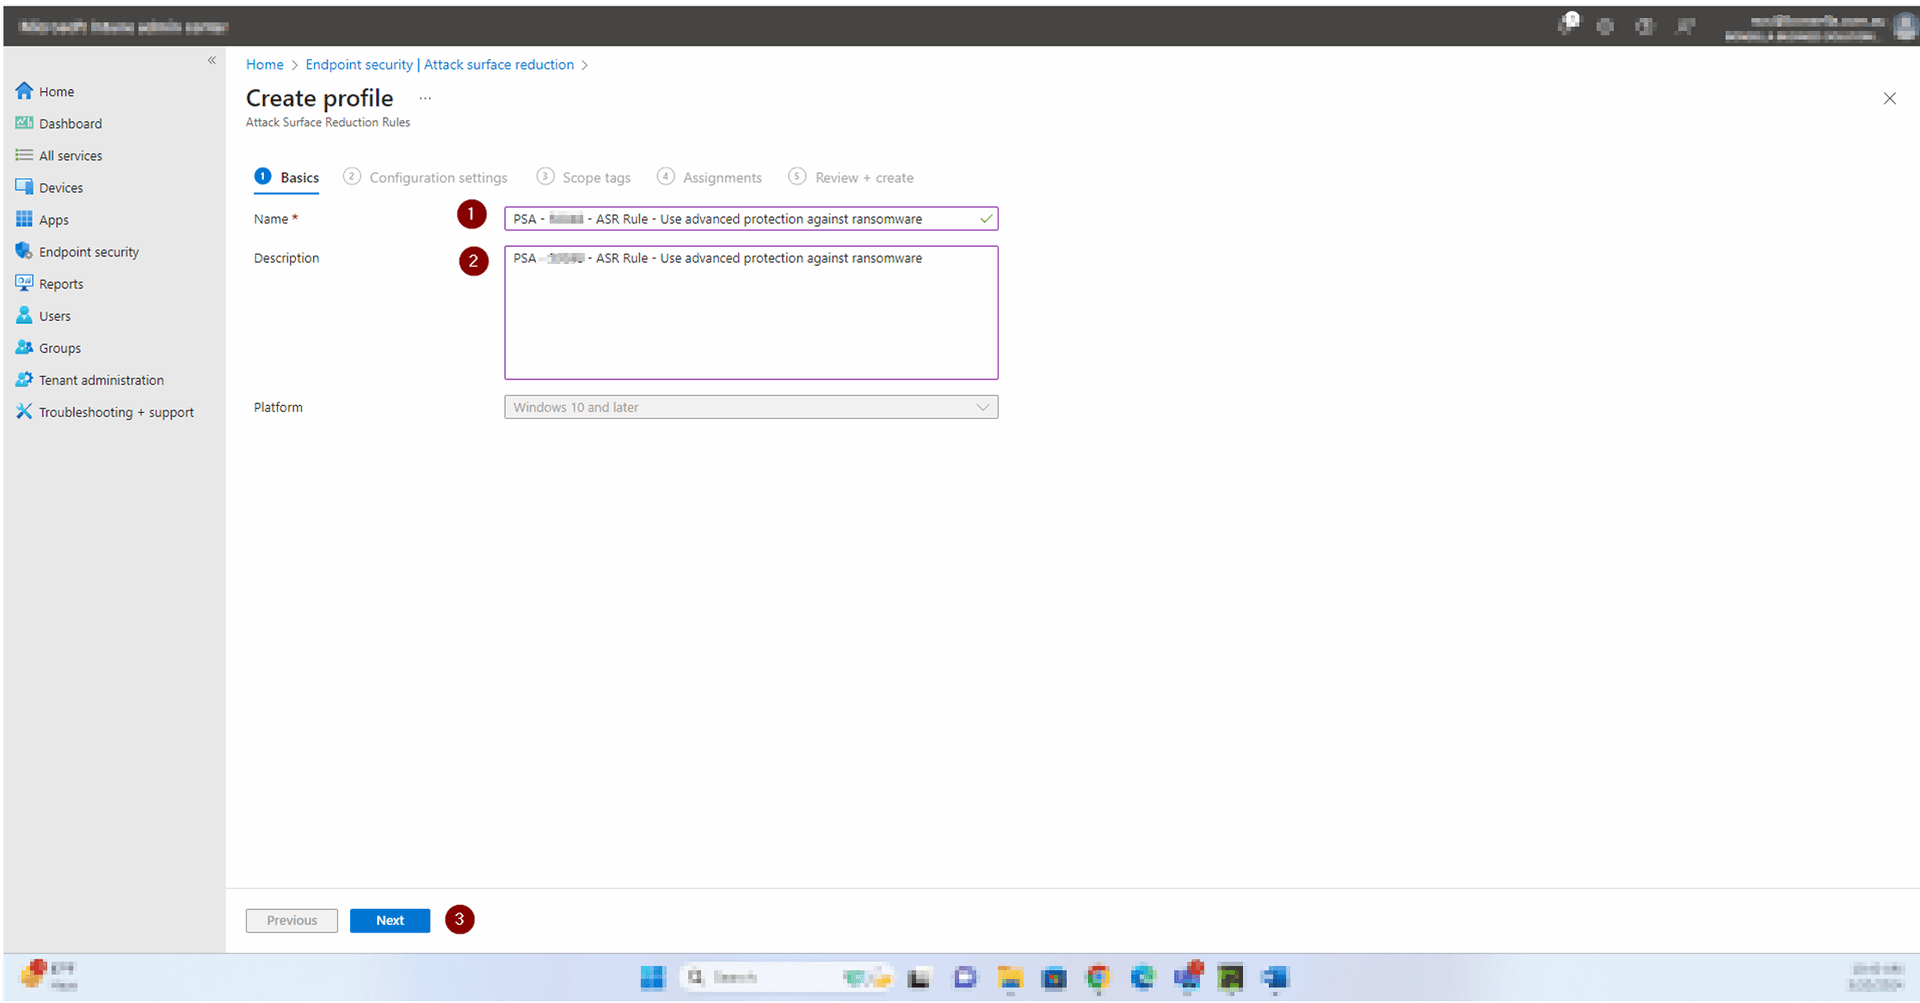
This rule is part of Microsoft's recommended baseline ASR policy and directly contributes to your M365 Secure Score.

Prerequisites

Access to Microsoft Intune admin center with Endpoint security administrator permissions.

Microsoft Defender for Endpoint licences assigned to target devices (included in Microsoft 365 Business Premium and above).

A designated test bench Azure AD group containing a small set of pilot devices for Stage 1 rollout.

Step-by-Step Instructions

Follow these steps carefully. The process uses a two-stage rollout: first to a test bench group for 7 days, then to all users once validated.

1
Screenshot required

Step 1 — Check Your M365 Secure Score

Before making any configuration changes, record your current M365 Secure Score as a baseline. 1. Open your browser and go to https://security.microsoft.com. 2. Sign in with your Microsoft 365 admin account. 3. In the left navigation, click Secure Score. 4. On the Secure Score overview page, note the current score displayed at the top (e.g. 45%). 5. Take a full-page screenshot of the Secure Score dashboard — this is your before score. Save it with a filename such as SecureScore-Before-Ransomware-[DATE]. 6. In the Recommended actions list, locate Use advanced protection against ransomware and confirm it shows as Address (not yet completed). This screenshot will be attached to the internal tech update RACE log (R field) once the policy is fully deployed.

Step 1 — Check Your M365 Secure Score
2
Screenshot required

Step 2 — Create an Attack Surface Reduction Profile

You will create a new Attack Surface Reduction (ASR) policy profile in Microsoft Intune. 1. Open a new browser tab and go to https://intune.microsoft.com. 2. Sign in with your Microsoft 365 admin credentials. 3. In the left navigation panel, click Endpoint security. 4. Under the Manage section in the left menu, click Attack surface reduction. 5. The Attack surface reduction policies list will appear. Click + Create Policy at the top of the page. 6. A Create a profile panel will slide open on the right side of the screen. 7. Under Platform, click the dropdown and select Windows 10, Windows 11 and Windows Server. 8. Under Profile, click the dropdown and select Attack Surface Reduction Rules. 9. Click the Create button at the bottom of the panel to proceed to the profile creation wizard.

Step 2 — Create an Attack Surface Reduction Profile
3
Screenshot required

Step 3 — Name and Describe the Profile

You are now on the Basics tab of the Create profile wizard. 1. In the Name * field, type exactly: PSA - S0048 - ASR Rule - Use advanced protection against ransomware 2. In the Description field, type exactly the same text: PSA - S0048 - ASR Rule - Use advanced protection against ransomware 3. Confirm the Platform field shows Windows 10 and later (this is read-only, set in the previous step). 4. Do not change any other settings on this tab. 5. Click Next at the bottom of the page to proceed to Configuration settings. Note: The naming convention PSA - S0048 follows the Technowand policy naming standard. Do not abbreviate or alter the name.

Step 3 — Name and Describe the Profile
4
Screenshot required

Step 4 — Set the Ransomware Rule to Block

You are now on the Configuration settings tab. This is where you set the specific ASR rule to Block mode. 1. Scroll down through the list of Attack Surface Reduction settings. Most will show Not configured — leave all of these as-is. 2. Locate the setting labelled Use advanced protection against ransomware. 3. Click the dropdown next to this setting and select Block. 4. Important: Do not change any other settings on this page. All remaining settings must stay as Not configured. 5. Verify the Use advanced protection against ransomware row now shows Block in the dropdown. 6. Take a screenshot of this configuration page showing the Block selection for your records. 7. Click Next at the bottom of the page to proceed to Scope tags. 8. On the Scope tags tab, the Default scope tag will already be applied. Do not add or remove any tags. Click Next to proceed to Assignments.

Step 4 — Set the Ransomware Rule to Block
5
Screenshot required

Step 5 — Assign to Test Bench Group (Stage 1)

This is Stage 1 of the rollout. Assign the policy to test bench groups only. Do NOT add all users at this stage. 1. You are now on the Assignments tab. 2. Under Included groups, click + Add groups. 3. A Select groups to include panel will open. In the Search box, type Technowand — the list will filter results. 4. Tick the checkbox next to Technowand and Customer Testbench. 5. Then search for Test Bench and tick the checkbox next to Test Bench Group (TestBenchGroup@bonsella.com.au). 6. Confirm the Selected panel on the right shows Selected: 2 with both groups listed. 7. Click Select to confirm and close the panel. 8. Back on the Assignments tab, confirm both groups appear under Included groups with the correct device and user counts. 9. Under Excluded groups, leave this empty — no exclusions are required. 10. Click Next to proceed to Review + create. After completing Step 6, wait 7 days before proceeding to Stage 2. Monitor test bench users for any unexpected application or workflow issues during this period.

Step 5 — Assign to Test Bench Group (Stage 1)
6
Screenshot required

Step 6 — Review, Confirm, and Create

You are now on the Review + create tab. Carefully verify every field in the Summary before clicking Create. 1. Under Basics, confirm: • Name: PSA - S0048 - ASR Rule - Use advanced protection against ransomware • Description: PSA - S0048 - ASR Rule - Use advanced protection against ransomware • Platform: Windows 10 and later 2. Under Configuration settings, confirm Defender is listed (confirms the ASR rule is included). 3. Under Scope tags, confirm Default is listed. 4. Under Assignments — Included groups, confirm both groups are present: • Technowand and Customer Testbench — 0 devices, 2 users • Test Bench Group — 0 devices, 1 user 5. Confirm Excluded groups shows No results. 6. If everything looks correct, click Create. 7. Intune will create the policy and return you to the Attack surface reduction policies list. Locate PSA - S0048 - ASR Rule - Use advanced protection against ransomware and confirm it shows Policy type: Attack Surface Reduction and Assigned: Yes. 8. Take a screenshot of the policies list showing the newly created policy and record the creation timestamp. 9. Update the internal RACE log: • R: Secure Score before = [your before screenshot score] • A: Use advanced protection against ransomware — Added Test Bench — Screenshot (Wait 7 days) • Policy created: [timestamp] After 7 days with no issues reported, return to this policy, go to Assignments, and add all users to complete Stage 2. Record the updated Secure Score in the C field of the RACE log.

Step 6 — Review, Confirm, and Create

How to Confirm It's Working

After 7 days, return to M365 Secure Score and take a new screenshot. The Use advanced protection against ransomware recommendation should show as completed for the test bench devices.

In Intune, navigate to Endpoint security > Attack surface reduction and confirm the policy shows as Assigned with target set to your test bench groups.

Once validated with no user issues after 7 days, edit the policy assignment to include all users to complete Stage 2. Record the updated Secure Score after the full rollout.

Frequently Asked Questions

Will enabling this rule cause disruptions for end users?

Microsoft designed this ASR rule to block malicious or obfuscated behaviours without impacting normal day-to-day work. The staged rollout to a test bench group first allows you to monitor for any unexpected impacts before deploying to all users. Most organisations experience no user-visible disruption.

How long does it take for the Secure Score to update after applying the rule?

M365 Secure Score typically refreshes within 24 to 48 hours after a policy change is detected and applied to devices. For the score to fully reflect the change, devices must check in with Intune and have the policy applied successfully.

What is the difference between Block mode and Audit mode for this rule?

In Audit mode, the rule logs detections without taking any action — useful for testing impact before enforcement. In Block mode, the rule actively prevents the detected behaviour. The Secure Score recommendation requires Block mode to be fulfilled. This SOP deploys directly to Block mode with a staged rollout as the risk mitigation strategy.

Do I need Microsoft Defender for Endpoint to use ASR rules?

Yes, Attack Surface Reduction rules are a feature of Microsoft Defender for Endpoint. They are included with Microsoft 365 Business Premium, Microsoft 365 E3, and Microsoft 365 E5 licences. Ensure your devices have the appropriate licence assigned before deploying.

How do I roll out the policy to all users after the test bench phase?

After 7 days with no issues, go to Endpoint security > Attack surface reduction in Intune, open the policy you created, and navigate to the Assignments tab. Click Add groups or Add all users to expand the assignment to your full user base. Save the change and record your updated Secure Score.

Need Help Improving Your M365 Secure Score?

Our team specialises in Microsoft 365 security assessments and managed security services. We can review your Secure Score, prioritise the highest-impact improvements, and handle the technical implementation for you.